
티스토리 뷰
플러터는 ios 스타일의 위젯을 cupertino 라는 패키지로 제공한다.
pubspec.yaml 파일을 보면 cupertino_icons 라는 설정값이 보이는데 패키지는 플러터가 기본으로 제공하는 ios 아이콘 묶음이다.
dependencies 설정 : pubspec.yaml 파일에서 dependencies 설정은 누군가 이미 구현해 놓은 패키지를 가져와서 사용할 수 있도록 하는 방법
CupuertinoMain.dart 예제코드
import 'package:flutter/cupertino.dart';
import 'animalItem.dart';
import 'iosSub/cupertinoFirstPage.dart';
import 'iosSub/cupertinoSecondPage.dart';
List<Animal> favoriteList = List.empty(growable: true);
class CupertinoMain extends StatefulWidget {
@override
State<StatefulWidget> createState() {
return _CupertinoMain();
}
} // _CupertinoMain 클래스를 반환한다.
class _CupertinoMain extends State<CupertinoMain> {
CupertinoTabBar? tabBar;
List<Animal> animalList = List.empty(growable: true);
@override
void initState() {
super.initState();
tabBar = CupertinoTabBar(items: <BottomNavigationBarItem>[
BottomNavigationBarItem(icon: Icon(CupertinoIcons.home)),
BottomNavigationBarItem(icon: Icon(CupertinoIcons.add)),
]);
//_CupertinoMain 클래스에서 initState() 함수를 재정의한다. 여기서 tabBar를 통해서 탭바에서 각 탭에 표시할 아이콘을 추가한다. 쿠퍼티노 디자인에서는 CupertinIcons.add 와 같이 사용한다.
animalList.add(
Animal(animalName: "벌", kind: "곤충", imagePath: "repo/images/bee.png"));
animalList.add(Animal(
animalName: "고양이", kind: "포유류", imagePath: "repo/images/cat.png"));
animalList.add(Animal(
animalName: "젖소", kind: "포유류", imagePath: "repo/images/cow.png"));
animalList.add(Animal(
animalName: "강아지", kind: "포유류", imagePath: "repo/images/dog.png"));
animalList.add(Animal(
animalName: "여우", kind: "포유류", imagePath: "repo/images/fox.png"));
animalList.add(Animal(
animalName: "원숭이", kind: "영장류", imagePath: "repo/images/monkey.png"));
animalList.add(Animal(
animalName: "돼지", kind: "포유류", imagePath: "repo/images/pig.png"));
animalList.add(Animal(
animalName: "늑대", kind: "포유류", imagePath: "repo/images/wolf.png"));
} // 위에서 생성한 animalList에 Animal 객체를 차례로 추가시킨다.
@override
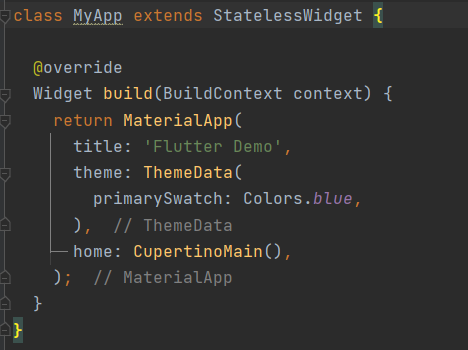
Widget build(BuildContext context) {
return CupertinoApp(
home: CupertinoTabScaffold(tabBar: tabBar!, tabBuilder: (context , value){
if(value == 0){
return CupertinoFirstPage(animalList: animalList,);
}else{
return CupertinoSecondPage(animalList: animalList,);
}}),
);}}
// build() 함수에서는 반환 값으로 MaterialApp이 아닌 CupertinoApp을 반환한다. -> ios 스타일
// CupertinoApp의 home 에서 CupertinoTabScaffold 를 선언하여 여기에 tabBar와 tabBuilder를 넣어준다.
// 탭은 두개이므로 각 탭을 누르면 tabBuilder에서 value가 0이나 1을 반환하고 이 값을 이용해서 탭의 로직을 처리한다.
lib 폴더 -> iosSub 폴더 -> cupertinoFirstPage / cupertinoSecondPage 다트 파일 생성
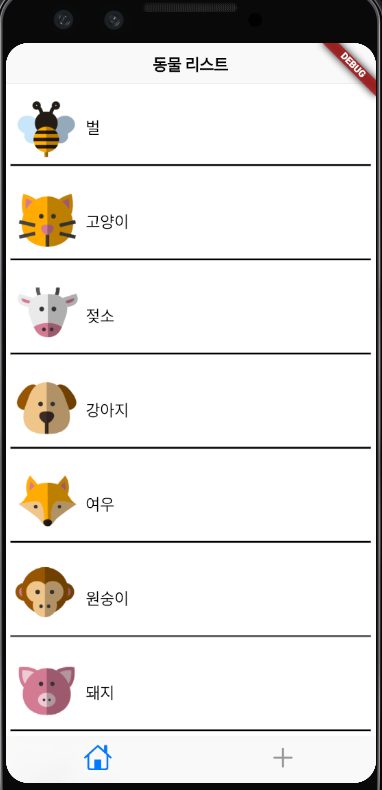
cupertinoFirstPage.dart 파일
cupertinoMain에서 만든 동물 리스트를 상속받아서 리스트뷰로 화면에 출력한다.
import 'package:flutter/cupertino.dart';
import '../animalItem.dart';
import '../cupertinoMain.dart';
//동물 리스트를 보여주는 클래스로 StatelessWidget 상속받음
class CupertinoFirstPage extends StatelessWidget {
final List<Animal> animalList;
const CupertinoFirstPage({Key? key, required this.animalList})
: super(key: key);
@override
Widget build(BuildContext context) {
return CupertinoPageScaffold(
navigationBar: CupertinoNavigationBar( // 쿠퍼티노에서는 카드 위젯이 없음 , 앱바 위젯도 없음
middle: Text('동물 리스트'),
),
child: ListView.builder(
itemBuilder: (context, index) {
return GestureDetector(
child: Container(
padding: EdgeInsets.all(5),
height: 100,
child: Column(
children: <Widget>[
Row(
children: <Widget>[
Image.asset( // 이미지 파일 불러오기
animalList[index].imagePath,
fit: BoxFit.contain,
width: 80,
height: 80,
),
Text(animalList[index].animalName) // 해당 동물이름 출력
],
),
Container( // 동물 리스트를 검정색 줄로 공간 구분하기
height: 2,
color: CupertinoColors.black,
)
],
),
) ,
onTap: (){ //onTap 이벤트를 통해서 이미지 클릭시 Dialog 보여준다.
showCupertinoDialog(context: context, builder: (context){
return CupertinoAlertDialog(
title: Text(animalList[index].animalName),
);
});
},
onLongPress: (){ //길게 누르면 해당 이벤트 실행됨
print('add fav');
favoriteList.add(Animal(animalName: animalList[index].animalName, kind: animalList[index].kind, imagePath: animalList[index].imagePath)); // cupertinoMain 에서 생성한 favoriteList에 탭을 길게 누를 시 해당 동물 객체를 리스트에 추가한다.
},
);
},
itemCount: animalList.length, // 리스트 길이만큼 반복
));
}
}
cupertinoSecondPage.dart 파일
세그먼트 위젯 ?
- 머티리얼의 라디오 버튼처럼 여럿 중 하나를 선택할 수 있는 ios 스타일 위젯
import 'package:flutter/cupertino.dart';
import '../animalItem.dart';
class CupertinoSecondPage extends StatefulWidget {
final List<Animal> animalList;
const CupertinoSecondPage({Key? key,required this.animalList}) : super(key: key);
@override
State<StatefulWidget> createState() {
return _CupertinoSecondPage();
}
}
class _CupertinoSecondPage extends State<CupertinoSecondPage> {
TextEditingController? _textController; // 텍스트 필드를 사용하기위한 컨트롤러 선언
int _kindChoice = 0;
bool _flyExist = false;
String? _imagePath;
Map<int, Widget> segmentWidgets = {
0: SizedBox( // 영역을 만들어주는 위젯
child: Text('양서류', textAlign: TextAlign.center),
width: 80,
),
1: SizedBox(
child: Text('포유류', textAlign: TextAlign.center),
width: 80,
),
2: SizedBox(
child: Text(
'파충류',
textAlign: TextAlign.center,
),
width: 80,
)
};
// Map 은 정수형 키와 위젯형 값을 쌍으로 해서 구성되며 위젯에 원하는 형태의 위젯을 넣으면 된다.
// 예에 사용한 SizeBox는 영역을 만들어 주는 위젯으로 Map에 값에 넣은 위젯이다.
// 참고로 텍스트만 넣으면 세그먼트가 너무 좁아서 width로 너비를 직접 입력해줘야한다.
@override
void initState() {
super.initState();
_textController = TextEditingController();
}
@override
Widget build(BuildContext context) {
return CupertinoPageScaffold(
navigationBar: CupertinoNavigationBar(
middle: Text('동물 추가'),
),
child: Container(
child: Center(
child: Column(
children: <Widget>[
Padding(
padding: EdgeInsets.all(10),
child: CupertinoTextField( // ios 스타일의 입력 창
controller: _textController,
keyboardType: TextInputType.text,
maxLines: 1,
),
),
CupertinoSegmentedControl( //세그먼트 위젯 사용 -> 동물의 종류를 선택하는 항목
padding: EdgeInsets.only(bottom: 20, top: 20),
groupValue: _kindChoice, // 0으로 초기화
children: segmentWidgets, //앞에서 Map으로 선언한 세그먼트위젯 객체를 children에 넣어줌
onValueChanged: (int? value) {
// 값이 바뀌었을 때 동작할 이벤트를 정의한다. 여기에서는 선택된 value값을 _kindChoice에 넣어준다.
setState(() {
_kindChoice = value!;
});
}),
Row(
children: <Widget>[
Text('날개가 존재합니까?'),
CupertinoSwitch(
value: _flyExist,
onChanged: (value) {
setState(() {
_flyExist = value;
});
})
],
mainAxisAlignment: MainAxisAlignment.center,
),
Container(
height: 100, // 가로 리스트 뷰에서 height 크기 설정하는거 중요함!
child: ListView(
scrollDirection: Axis.horizontal,
children: <Widget>[
GestureDetector(
child: Image.asset('repo/images/cow.png', width: 80),
onTap: () { // 이벤트를 통해 선택된 동물의 이미지 저장
_imagePath = 'repo/images/cow.png';
},
),
GestureDetector(
child: Image.asset('repo/images/pig.png', width: 80),
onTap: () {
_imagePath = 'repo/images/pig.png';
},
),
GestureDetector(
child: Image.asset('repo/images/bee.png', width: 80),
onTap: () {
_imagePath = 'repo/images/bee.png';
},
),
GestureDetector(
child: Image.asset('repo/images/cat.png', width: 80),
onTap: () {
_imagePath = 'repo/images/cat.png';
},
),
GestureDetector(
child: Image.asset('repo/images/fox.png', width: 80),
onTap: () {
_imagePath = 'repo/images/fox.png';
},
),
GestureDetector(
child: Image.asset('repo/images/monkey.png', width: 80),
onTap: () {
_imagePath = 'repo/images/monkey.png';
},),],),),
CupertinoButton( // ios 스타일의 버튼 위젯
child: Text('동물 추가하기'),
onPressed: () {
widget.animalList.add(Animal(
animalName: _textController!.value.text,
kind: getKind(_kindChoice),
imagePath: _imagePath!,
flyExist: _flyExist));
})
],
mainAxisAlignment: MainAxisAlignment.center,
),),),);}
getKind(int kindChoice) {
switch (kindChoice) {
case 0:
return "양서류";
case 1:
return "파충류";
case 2:
return "포유류";
}}}
main.dart 클래스
main 클래스에서 MaterialApp의 home을 CupertinoMain()으로 설정해 준다.
그 밖의 쿠퍼티노 위젯
1. 버튼 CupertinoButton
일반 FlaButton이나 RaisedButton과 같은 기느으이 ios 스타일의 버튼
CupertinoButton(
child: Text('button'),
color: Colors.blue,
onpressed:()
)
2. 로딩 표시기
CupertinoActivityIndicator 위젯은 ios 스타일의 로딩 표시기 입니다. radius 속성을 이용해 크기를 조절할 수 있다.
child: Center(
child: CupertinoActvityIndicator(
radius: 20, //크기를 의미
)
)
3. 알림창 CupertinoAlertDialog
CupertinoAlertDialog 는 iso 스타일의 알림창
CupertinoButton(
child: Text('dialog'),
onPressed: () {
showCupertinoDialog(
context: context,
builder: (context){
return CupertinoAlertDialog(
title: Text('Cupertino'),
content: Text('쿠퍼티노 스타일의 위젯'),
actions: [
CupertinoButton(
child: Text('확인'),
onPressed: (){
Navigator.of(context).pop();
})])})})
4. 액션시트 CupertinoActionSheet
안드로이드는 알림창으로 다양한 동작을 구현할 수 있다면, ios는 알림창 이외에 하단에 표시되는 액션시트를 이용해 선택사항을 나열할 수 있다. 이떄는 showCupertinoModalPopup() 함수를 통해 CupuertinoActionSheet를 호출한다.
showCupertinoMadalPopup(context: context, builder: (context){
return CupertinoActionSheet(
title: Text('Action'),
message: Text('좋아하는 색은'),
actions: [
CupertinoButton(child: Text('Red'), onPressed: (){}),
CupurtinoButton(child: Text('Blue'), onPressed: (){}),
],
cancelButton: CupertinoButton(child: Text('취소'), onPressed(){
Navigator.of(context).pop();
})
);
});
5. 피커 CupertinoPicker
ios에서는 화면 하단에 표시되는 창이 많은 편이다. 그중에서 피커는 스크롤을 이용해 이벤트를 처리하는데, 액션시트처럼 showCuprtinoMadalPopup() 함수로 호출한다. 보통 피커를 사용할 떄는 컨테이너로 높이를 정하고 이 높이를 가득채우는 Expanded() 함수를 호출해 스크롤하는 쿠퍼티노피커의 길이를 최대한 길게 설정한다.
6. 내비게이션바 CupertinoNavigationVar
내비게이션바를 표시하는 CupertinoNavigationBar는 스캐폴드에서 appBar 위치에 사용하는 위젯이다.
appBar : CupertinoNavigatorBar(
leading: CupertinoButton(child: Icon(Icons.arrow_back_is_ios),
onPressed(){}),
middle: Text('Cupertino Design'),
trailing: CupertinoButton(child: Icon(Icons.exit_to_app), onPressed(){}),
),
7. 슬라이더 CupertinoSlider
ios 스타일의 슬라이더로 기존의 머티리얼의 슬라이더와 사용법은 동일하다.
CupertinoSlider(
value: _value,
onChanged: (index){
setState((){
_value = index;
});
},
max:100,
min: 1,
),
Text(_value.toString())
'플러터 앱 스터디 일지' 카테고리의 다른 글
| 플러터 스터디 chap 8 (0) | 2021.10.06 |
|---|---|
| 플러터 스터디 chap 7 (0) | 2021.10.06 |
| 플러터 스터디 chap 5 (0) | 2021.09.27 |
| 플러터 스터디 chap 4 (0) | 2021.09.26 |
| 플러터 스터디 chap 3 (0) | 2021.09.26 |